Client Challenge
The owner of this service station had been experiencing increasing water leaks, indicating the deteriorating condition of this old roof. After winning the project bid, the contractor asked Structura View to survey the roof’s condition to understand the extent of the roofing problems.
The goal was to identify how to move forward and the most cost-effective solutions. The options under consideration were a roof coating, re-roof, and complete roof replacement along with the best way to address the current structural concerns with the wooden roof deck.
Roof Data
Location: Winter Haven, Florida
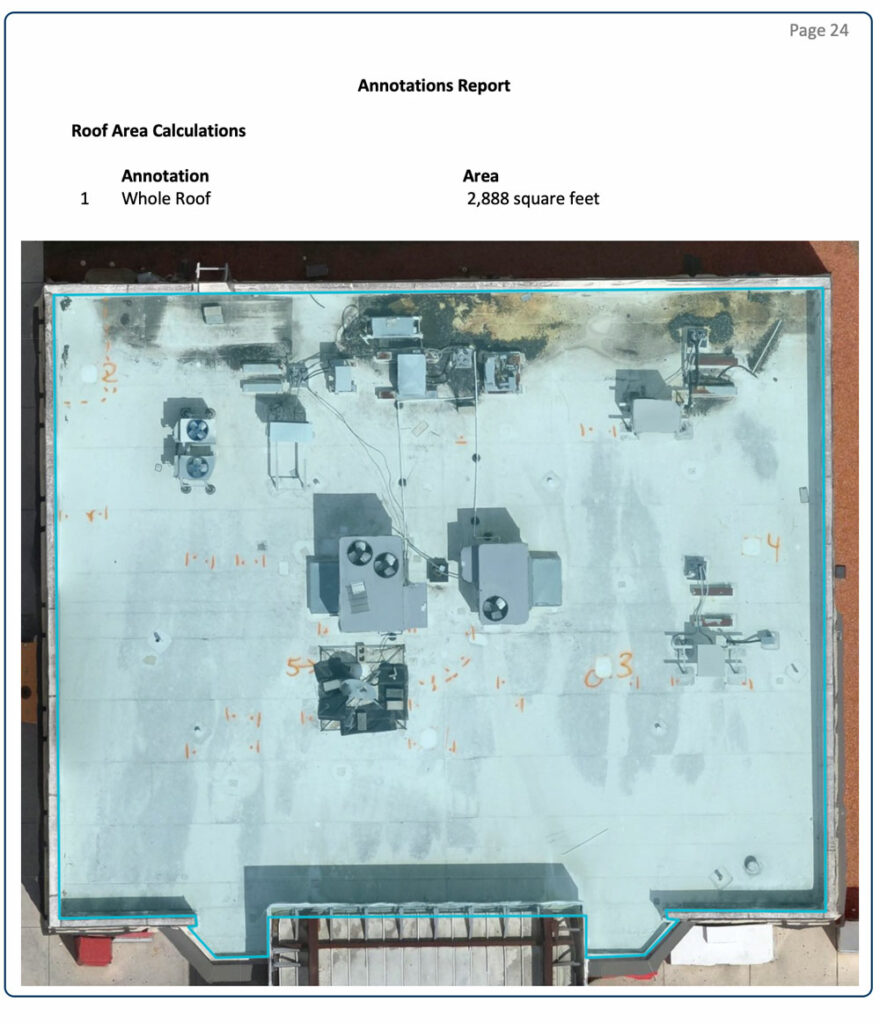
Roof Area: Estimated 2,888 Square Feet
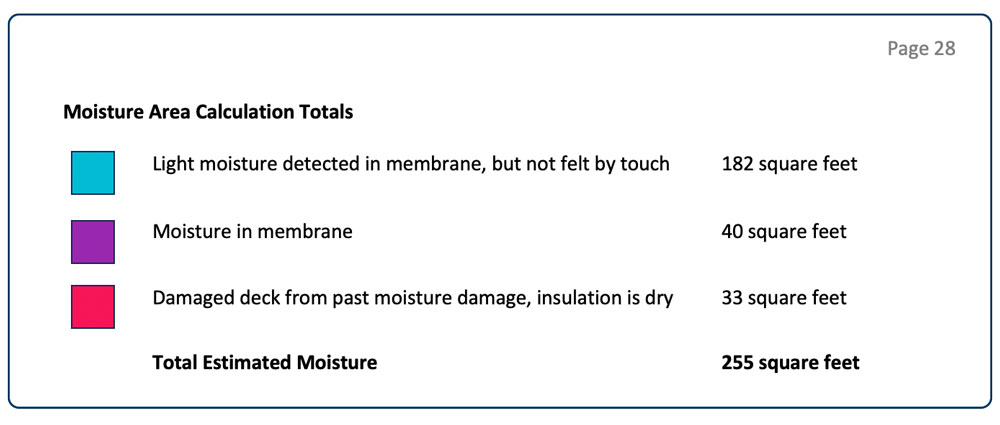
Moisture Content: Estimated 255 Square Feet
Percent of Moisture Intrusion: Estimated 8.82%
Roof Sections: 1
Roof Composition: TPO membrane, ISO board insulation over a wood deck.
Type & Purpose of Survey: Survey Low Sloped Roof for Internal Moisture Content.
Solution Strategy
Structura View performed a moisture survey of the roof. The process included performing a non-destructive impedance moisture survey, electrical resistance testing on core samples, and capturing drone-based visual imaging creating a moisture map documenting where moisture was painted/observed in the roof system. The roof has 1 section that is estimated to be 2,888 square feet in total area and is comprised of a TPO membrane and ISO board insulation over a wood deck.
Some areas of the roof had ponding water present that prevented us from being able to perform moisture testing. Some areas around those ponded water locations felt like the deck was flexing when stepped on.
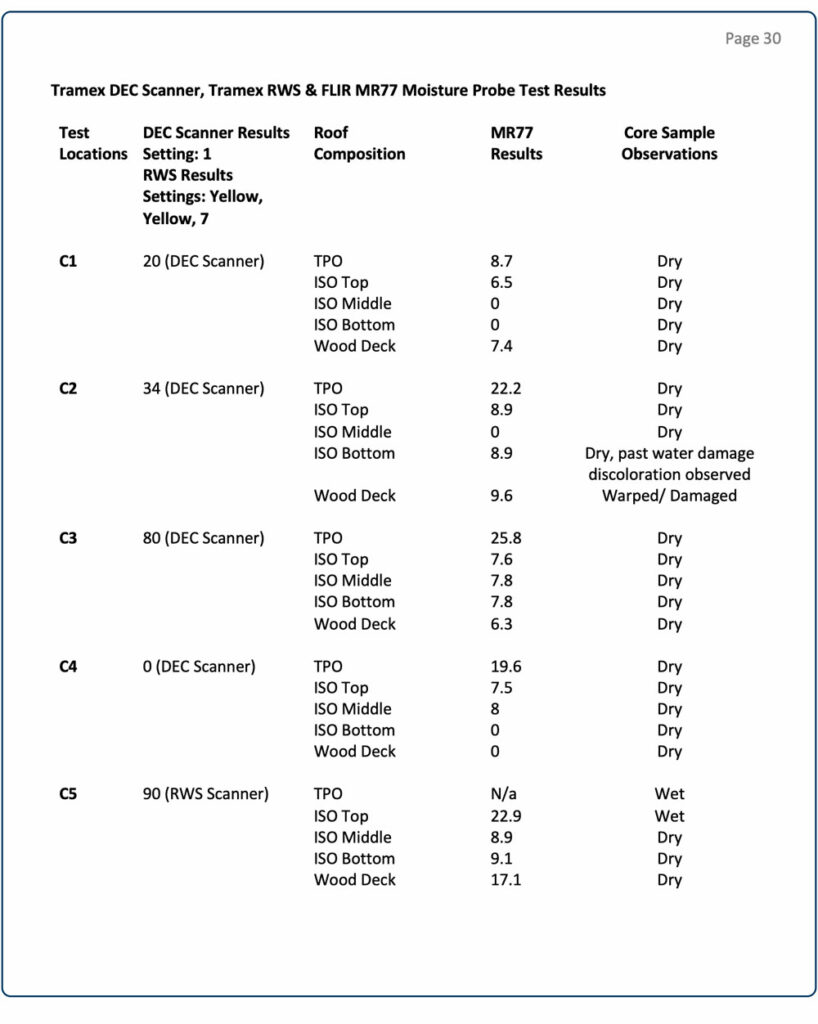
The moisture meter testing portion of the moisture survey was completed with a TRAMEX DEC Scanner and a TRAMEX RWS. The DEC Scanner settings were adjusted to closely correlate the observed moisture readings from the moisture probe test results as possible. For example, a DEC Scanner reading of 80 indicated slightly elevated moisture in the membrane with dry insulation and deck. 0% indicated dry. The DEC Scanner was used to test across all the membrane laps where the paint was marked to indicate the beginning and end of a moisture location observed in that lap. The RWS moisture meter was set with a sensitivity of 7 and was used to test around the satellite dish.
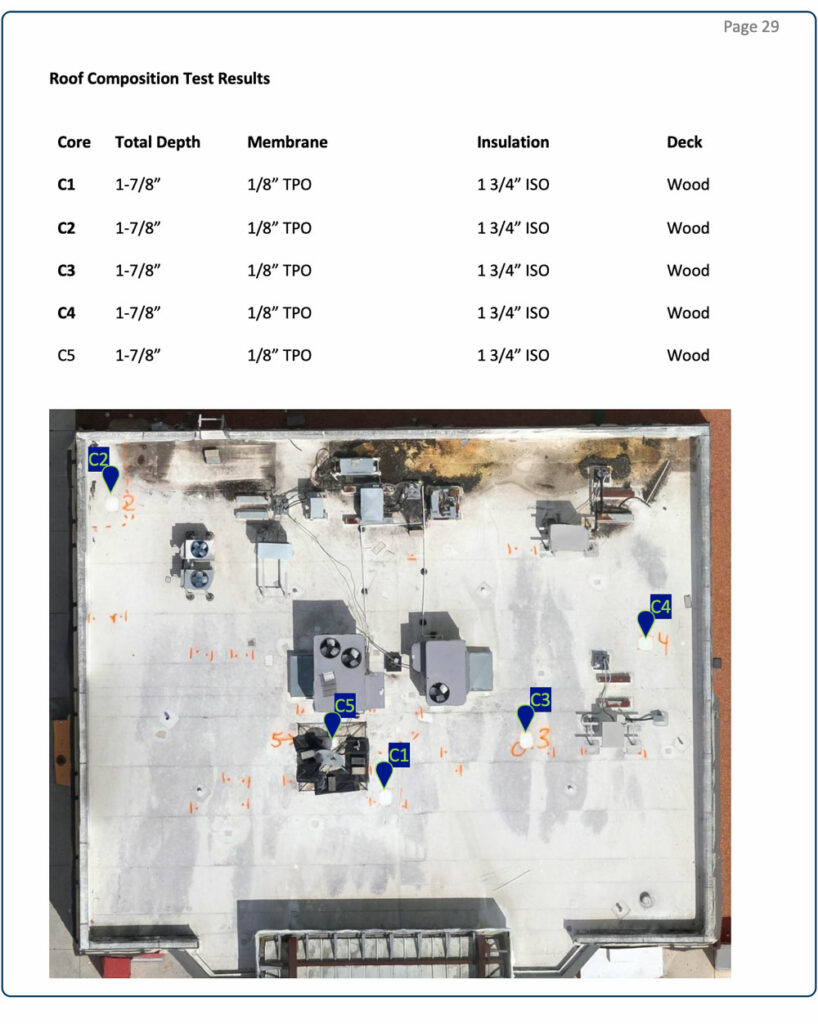
Structura View team performed electrical resistance moisture testing on 5 core cuts to help validate suspected wet/dry locations, understand where moisture is retained within the roof’s composition, and document visually observed conditions.
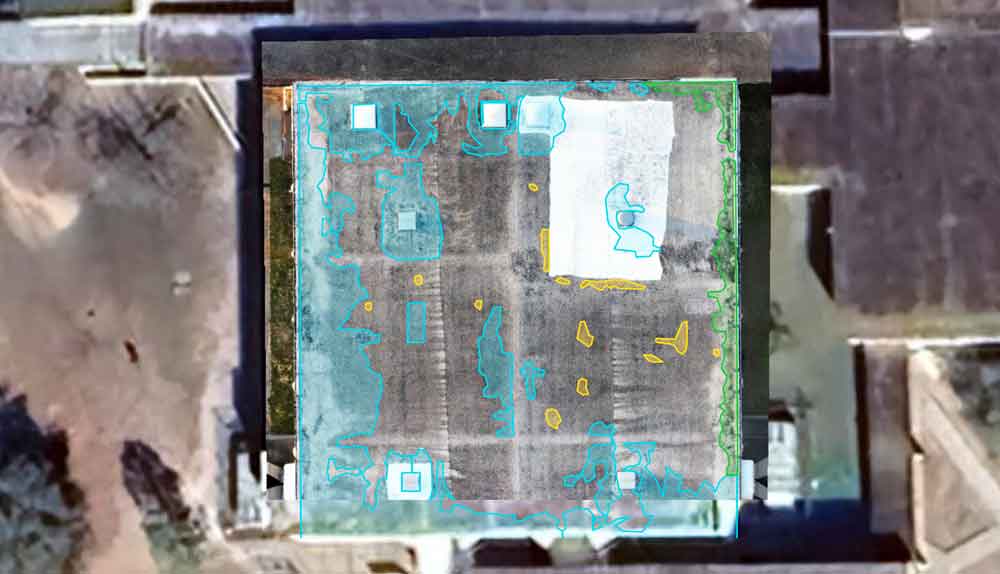
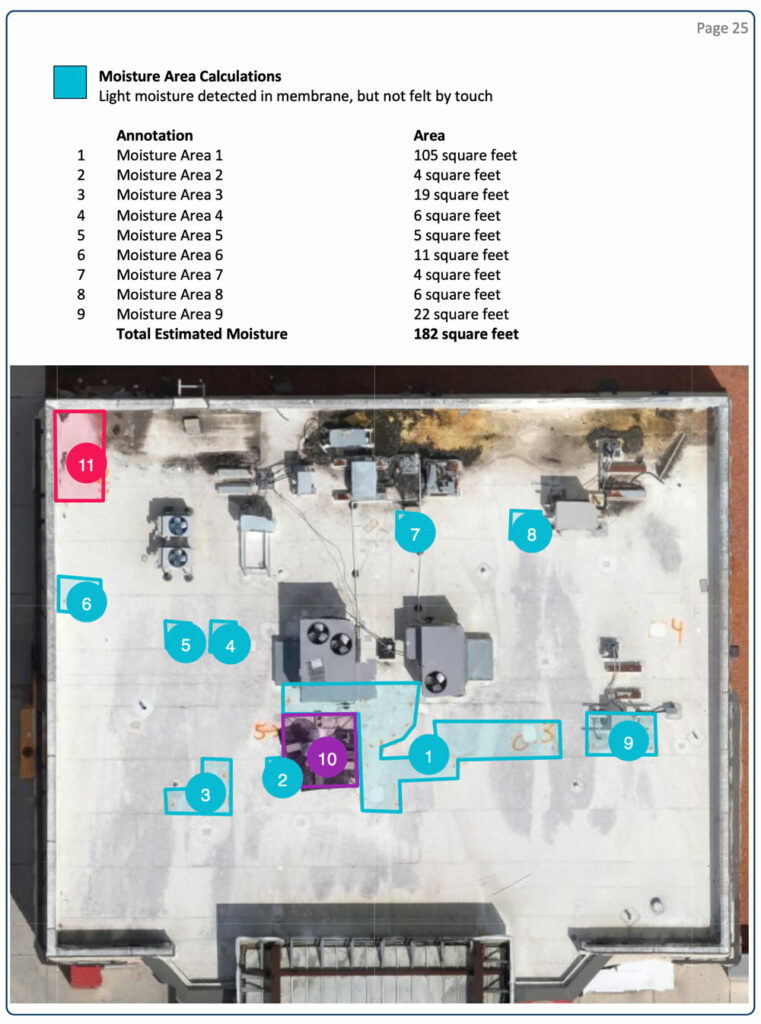
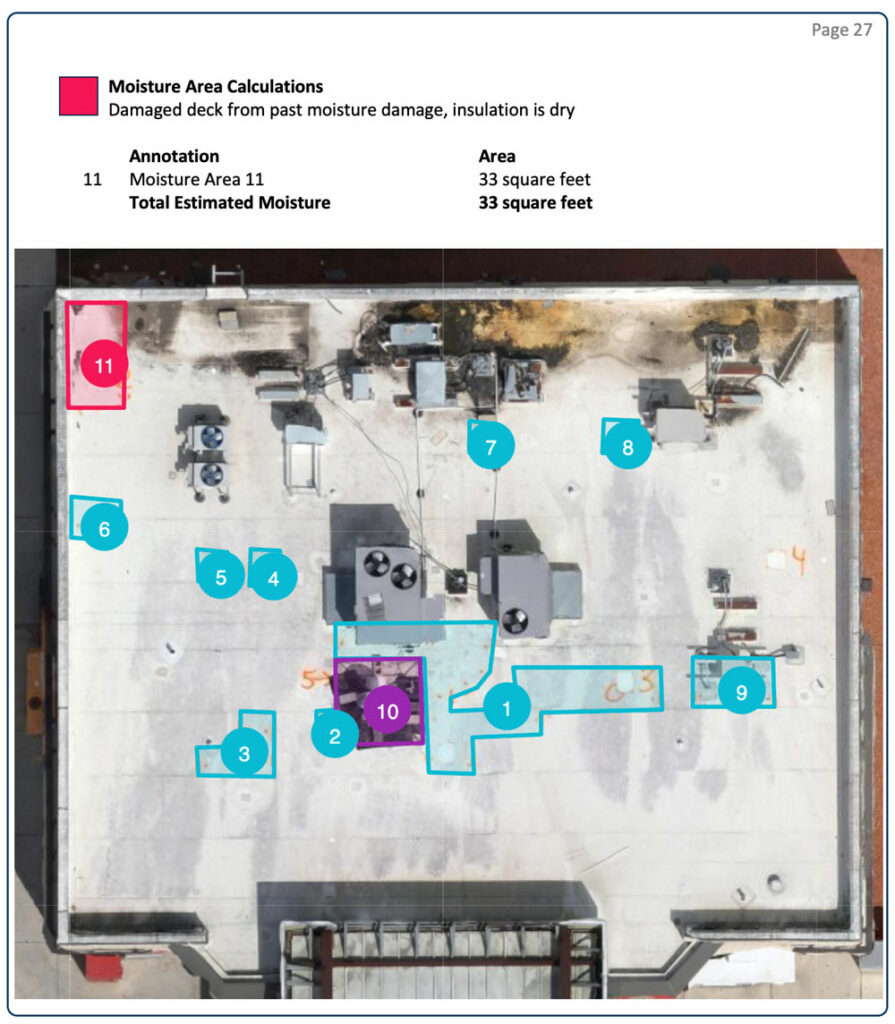
From the data collected, 11 moisture locations have been highlighted with 3 different colors.
The blue highlighted areas represent portions of the roof where slightly elevated moisture readings were observed in the TPO membrane only. The blue highlighted areas totaled an estimated 182 square feet.
The purple highlighted area represents where moisture was observed in the insulation and membrane. The purple highlighted area totaled an estimated 40 square feet of moisture-damaged membrane and insulation.
The red highlighted area represents where slightly elevated moisture readings were observed in the membrane and no current moisture was observed in the insulation or deck, but signs of past moisture were present as the deck was warped and ISO was discolored. The red highlighted area totaled an estimated 33 square feet. The combined total of these three areas is 255 square feet.
Let’s Take a Look at Key Pages from the Report
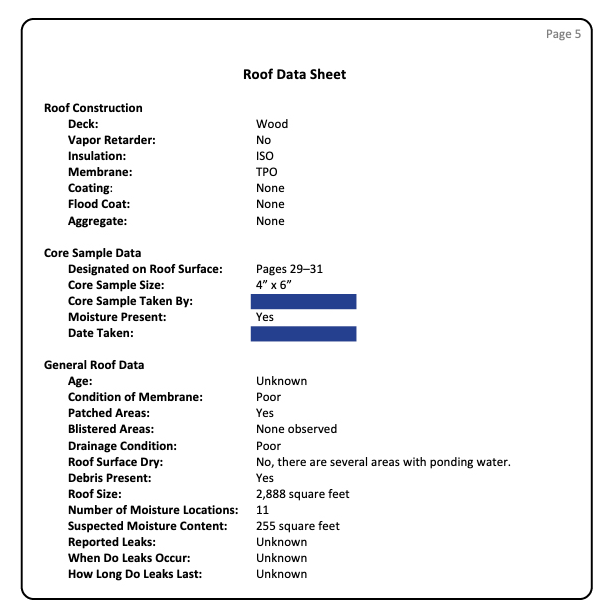
The first notable page in the report is the “Roof Data Sheet”, providing a concise summary of key roof attributes. This sheet offers a high-level overview, with detailed information on aspects such as Roof Construction, Moisture Location, and Core Sample data which are elaborated in great detail further within the report.
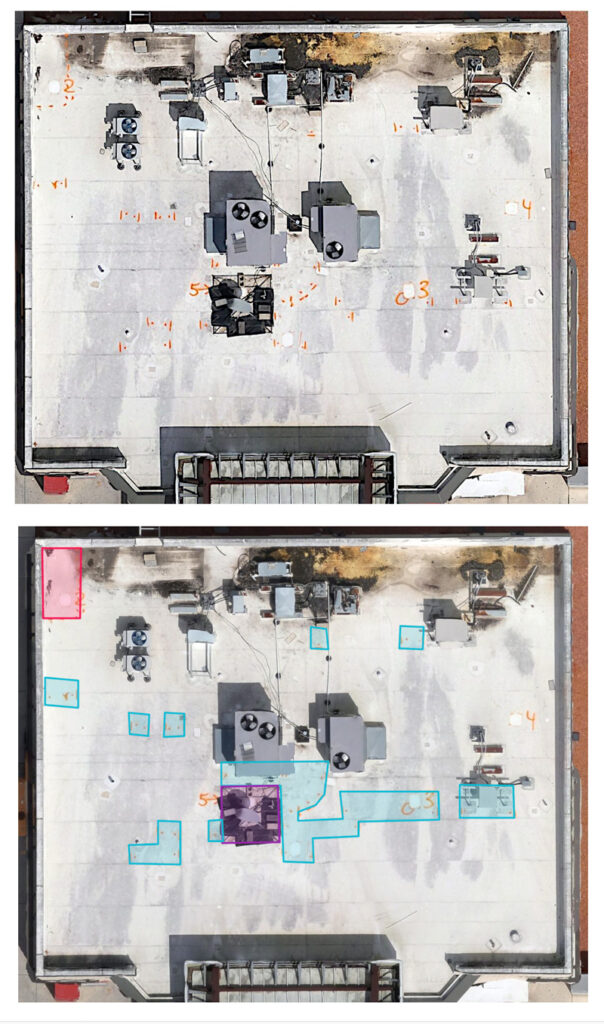
The next section of the report gives both an overview and close-up details showing visual images of the roof without any highlighting along with the corresponding visual image with a moisture mapping of the validated moisture areas. Here are some sample images taken from this section of the report.
Image Set: 1
Subject Priority: 1
Height: 125’ AGL Stitched
Image Type: Visible
Location: Whole Roof
Equipment: DJI Matrice M30T, TRAMEX DEC Scanner, FLIR MR77
Comments: Areas outlined in orange are moisture edges which were identified using the TRAMEX DEC Scanner. We then used these orange spray-painted outlines to create highlighted moisture locations using image mapping software. These two images are below.
The first step in getting the moisture data for this project involved doing a non-intrusive electrical capacitance scan using the TRAMEX DEC Scanner. The process starts by calibrating the DEC scanner settings to correlate with the initial sample moisture readings found on the roof. For example, a DEC Scanner reading of 80 indicated slightly elevated moisture in the membrane with dry insulation and deck. 0% indicated dry.
After calibrating the scanner, the process continues by making overlapping passes going back and forth in an organized pattern around the roof and marking the edges where moisture intrusion starts. Below is a video of the TRAMEX DEC Scanner in use on a different project in Tampa.
How are Congested Areas Tested?
The large TRAMEX DEC Scanner in the video above is an amazing tool for identifying moisture intrusion in open areas. It covers large areas with speed and precision.
In crowded or dense areas as we see in the image below, the TRAMEX DEC Scanner won’t fit, so we switch to the smaller, TRAMEX RWS Scanner which sits on the end of a long pole and is easily placed on the roof area being tested.
Below is where the TRAMEX RWS Scanner was used. The top image shows the area tested, and the image below has two different colored outlines indicating moisture intrusion was identified in these areas. The purple area identifies moisture was found only in the membrane and the blue highlighted area identifies light moisture detected in the membrane and not felt by touch.
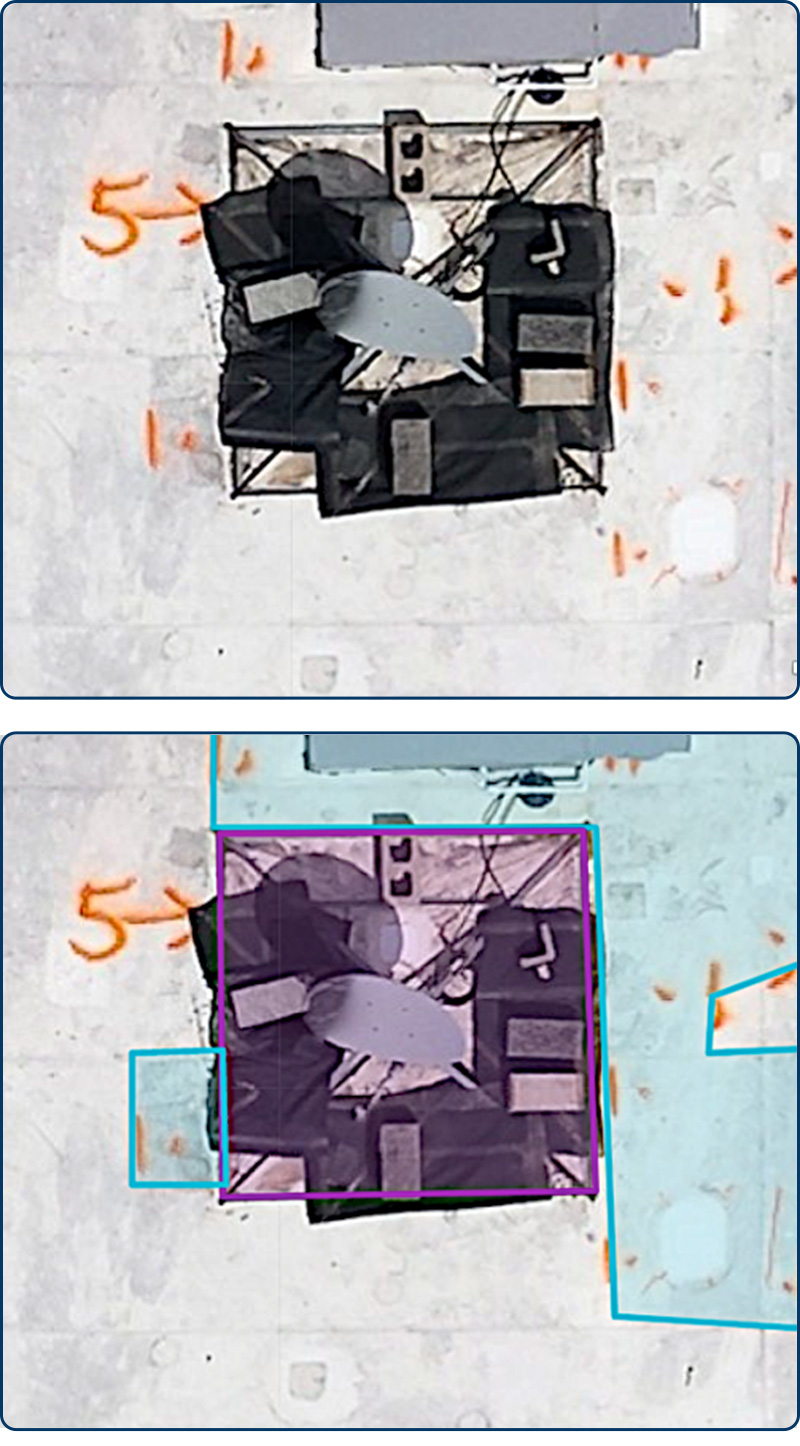
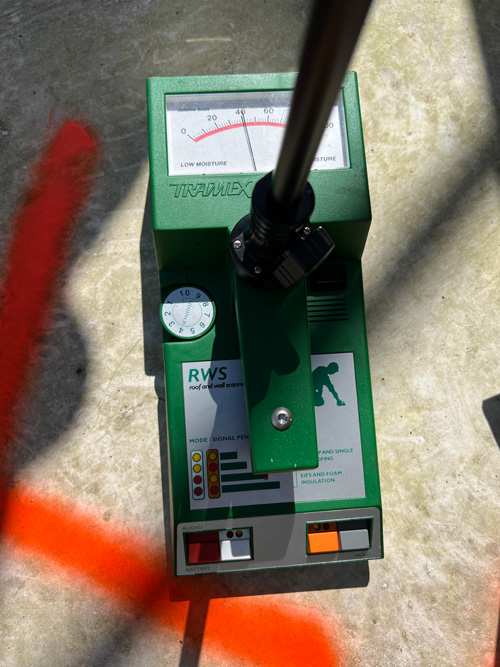
TRAMEX RWS Moisture Scanner
The TRAMEX RWS Scanner is another type of nondestructive scanner it’s only about 4″ x 8″ which allows us to reach areas around equipment and in congested areas. This scanner is calibrated for the specific roof conditions before testing.
The RWS Scanner registered 90 out of 100 on the meter in this congested area indicating there was some type of moisture intrusion. To validate the findings, we performed a core sample and used the FLIR MR77 with moisture probes to test each layer. The results identified the top area of the ISO layer was wet and the lower portion of the ISO layer down through the wood deck was dry.
Survey Results: Key Pages
The total roof area is 2,888 square feet with 255 square feet of moisture intrusion including the 33 square feet of the damaged deck from past moisture damage. The following pages visually show the results.
Moisture area calculations quantify the extent of moisture intrusion and are accurately determined following the validation of suspected moisture areas using core samples. In the survey for this roof, we broke the moisture area calculations into three color-coded categories. Blue for light moisture in the membrane, purple for somewhat heavier moisture in the membrane, and red for damaged areas due to past moisture.
Below are the moisture area calculations for this roof, compiled after core sample validation.

Core Sample Analysis
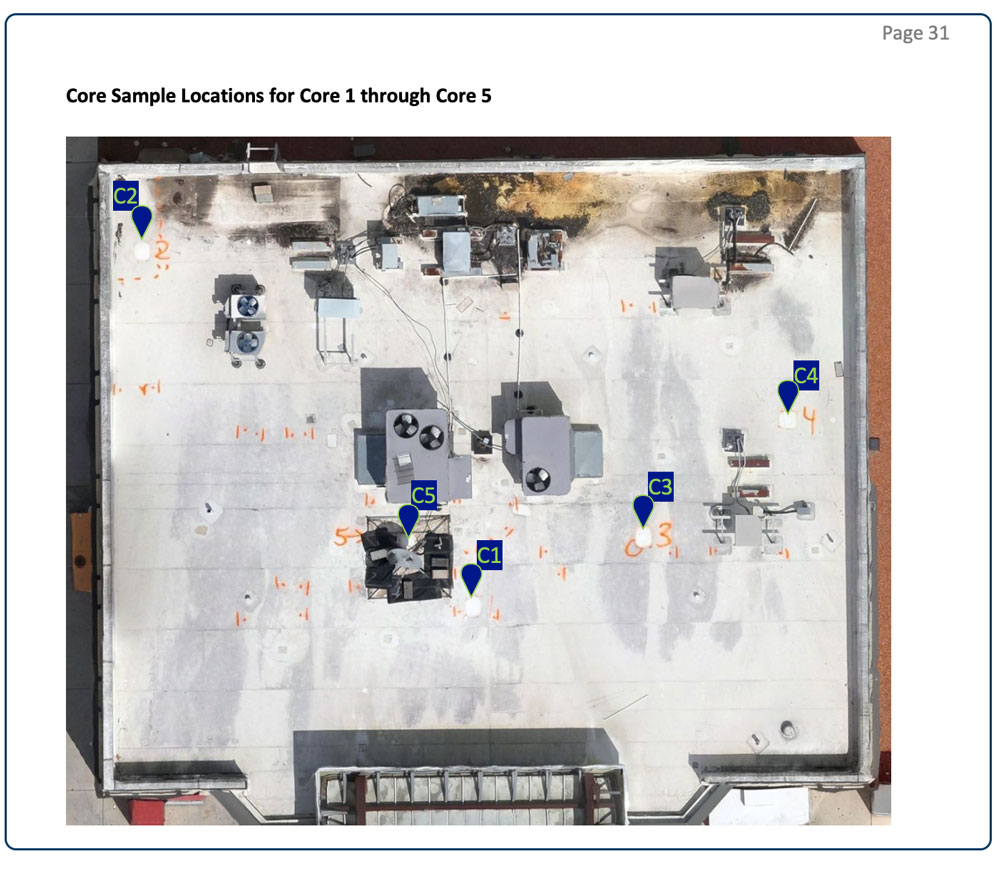
The 5 core samples taken show the roof composition having consistent layers and layer depth throughout the roof. The graphic below shows blue pins with a green outline showing the core sample locations.
The FLIR MR77 with moisture probes returned the following moisture levels within each of the 5 core samples. The results of each roof layer in these samples help us validate our roof scans and allow for accurate highlighting of moisture areas in the roof.
Wrapping Up
The roof had minimal moisture intrusion, measuring just under 9%. However, there were noticeable issues such as sunken areas resulting in soft and spongy sections, several spots missing the wooden deck, ponding water in certain areas, and damage to portions of the wood deck from past moisture.
With the details from the report, the contractor will work with the client to determine the best course of action within the available budget. Potential options include repairing the damaged sections of the roof followed by a re-roof, conducting a complete tear-off and installing a new roof, or implementing necessary repairs followed by a coating application.