Moisture mapping is a highly beneficial service utilized in the commercial roofing industry for various applications such as helping to track down leaks, it can be a productive quality control check, help calculate the amount of moisture damage present to determine whether the roof is in a serviceable condition or if it is worth pursuing a roof coating, roof over or full replacement for the client. This service is often utilized in the insurance claims process to help understand conditions from storm damage and much more.
Why Follow Procedural Standards
It is vital to the success of an operation to perform moisture mapping services based on an industry standard. ASTM International, Infraspection Institute and many more organizations have developed what they consider to be the appropriate parameters to conduct various moisture mapping services in a way that actually identifies where moisture is present. If you do not follow the standards and best practices, you are likely to discover the results will be unreliable.
Proper Deployment of Moisture Mapping Services
Step 1: Thermal Imaging (non-destructive) – Thermal imaging is used to identify portions of the roof that are suspected to contain moisture. We capture infrared images of the roof when the temperatures are changing. The temperature change will create a differential in the dry roof structure compared to the wet areas. The definition of a thermal image is the technique of using the heat given off by an object to produce an image of it or to locate it.
Our first step is to perform a drone based thermal scan mapping out where suspected moisture is present. The aerial imagery allows us to be able to quickly identify and calculate how much moisture is in the structure once confirmed. We will then use a hand held thermal imager once we are on the roof to help us identify the wet locations for further testing. When asked, we will then paint the outline of the wet spots for proper repair.
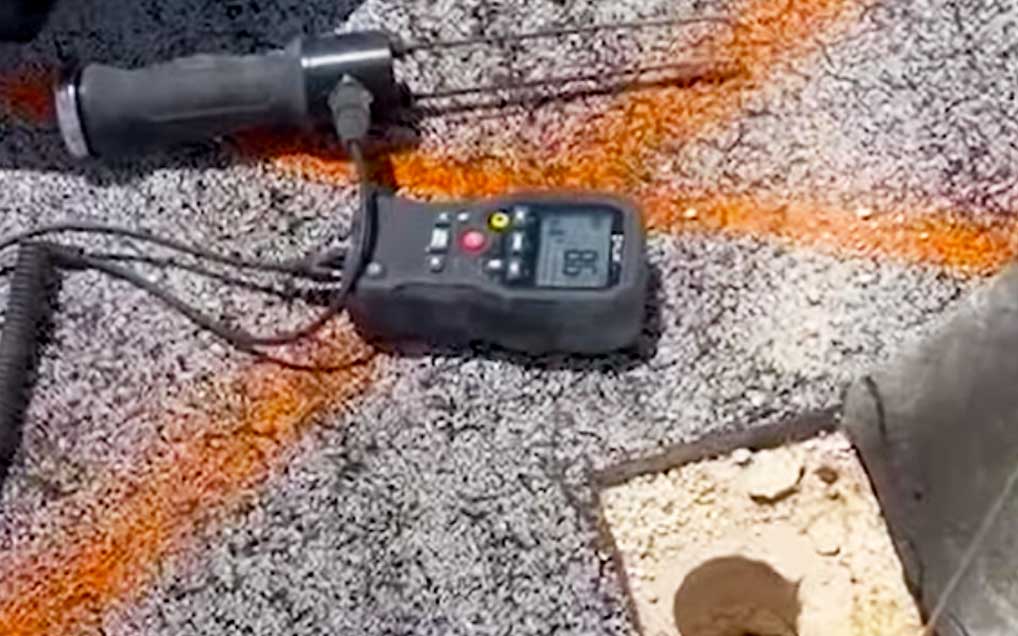
Step 2: Impedance/ Capacitance or Nuclear Moisture Meter Scans (non-destructive) – These hand held moisture meters emit low-frequency electronic signals from the bottom of the meter. If moisture is present, the electronic signal will cary through the moisture and return a reading to the meter that indicates whether moisture is present or not. There are various moisture meters on the market ranging from $20 to thousands of dollars. We utilize Tramex and FLIR moisture meters to help us with this portion of the survey. The Tramex RWS scanner has the ability to read multiple inches into the structure while the FLIR is capable of providing shallower depth readings. The test locations of this portion are typically determined by the suspected wet locations observed in the thermal imagery.
Nuclear testing is conducted using a nuclear scanner that emits neutrons from a radiation source in the scanner down through the roof assembly. The neutrons that encounter hydrogen in the roof assembly bounce back to the meter at a much slower rate. So when moisture is present, the slow returns reflect where moisture is present within the roof. These devices are often capable of reading up to 7″ in to the structure.
Step 3: Moisture Probe Testing (destructive testing) – These pin type moisture meters measure the electrical resistance between the 2 probes. For this moisture testing method to work properly, we have to stick the pins in to the structure. The less moisture is present, the more resistance the meter will detect. When moisture is present, the electricity flows more easily and very little resistance is detected, giving the moisture meter a reading that reflects moisture. The advantage to this practice is the ability to study where in the roof structure moisture is present. If you have multiple roofs, you can narrow down which roof the moisture is contained. The disadvantage is that you are puncturing the roof to get these readings.
Step 4: Core Samples (destructive testing) – Core samples provide value in a couple different ways. One, it gives us the ability to study and understand the construction of the roof. Knowing he components the roof is comprised of goes a long way by answering how thick the membrane is, how many layers of roof material is there, is the insulation absorptive, etc. We can also tangibly feel whether or not the insulation is wet or dry. We can also take the core samples back to the lab to weigh, dry and re-weigh the material to determine how much moisture was present.
End Result
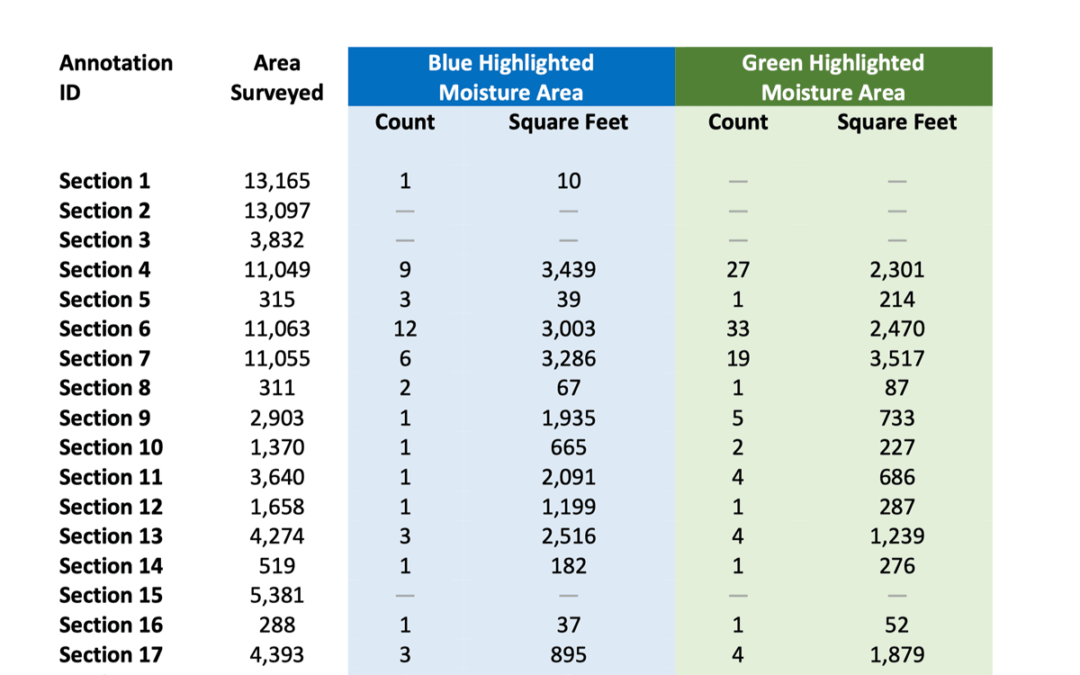
Once you have seen the moisture mapping and investigation process through to completion as described above, the result should reflect confidence in where moisture is present in the structure. Understanding where moisture is present paints an excellent picture of where your issues exist, calculates how much, and gives you a good base line to determine what your next steps and options look like.
Read more about moisture mapping.